COMO INSTALAR O LAMP NO MAGEIA 6 – Apache (servidor web)
Mas afinal o que é o LAMP?
Lamp é uma combinação de softwares livres e de código aberto. O acrônimo LAMP refere-se as primeiras letras de:
Linux (sistema operacional);
Apache (servidor web); MariaDB ou MySQL (software de banco de dados) e; PHP (linguagem de programação) ou Python.
Neste artigo, veremos como instalar o Apache, MariaDB e PHP na distribuição Linux Mageia em sua versão de número 6.
PRIMEIRO PASSO
Acesse o terminal da Mageia.
Acesse como usuário root usando o seguinte comando: $ su
SEGUNDO PASSO
Instalar o Apache. O servidor Apache (ou servidor HTTP Apache, em inglês: Apache HTTP Server, ou simplesmente: Apache, é o servidor web livre mais utilizado do mundo.
Digite o seguinte comando para instalar o Apache:
# urpmi apache
Habilite e inicie o serviço Apache usando o seguinte comando:
# systemctl enable httpd
# systemctl start httpd
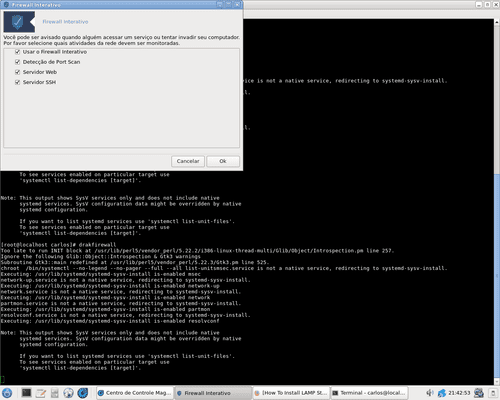
Configure o firewall para permitir o acesso do servidor web a clientes remotos. Digite o seguinte comando:
# drakfirewall
Selecione “Servidor Web” e clique em OK.
NOTE: RUNNING ALL PARTS OF THIS SCRIPT IS RECOMMENDED FOR ALL MariaDB
	      SERVERS IN PRODUCTION USE!  PLEASE READ EACH STEP CAREFULLY!

	In order to log into MariaDB to secure it, we'll need the current
	password for the root user.  If you've just installed MariaDB, and
	you haven't set the root password yet, the password will be blank,
	so you should just press enter here.

	Enter current password for root (enter for none): ## Pressione Enter
	OK, successfully used password, moving on...

	Setting the root password ensures that nobody can log into the MariaDB
	root user without the proper authorisation.

	Set root password? [Y/n] y ## Digite 'Y' e pressione Enter
	New password:
	Re-enter new password:
	Password updated successfully!
	Reloading privilege tables..
	 ... Success!


	By default, a MariaDB installation has an anonymous user, allowing anyone
	to log into MariaDB without having to have a user account created for
	them.  This is intended only for testing, and to make the installation
	go a bit smoother.  You should remove them before moving into a
	production environment.

	Remove anonymous users? [Y/n] ## Pressione Enter
	 ... Success!

	Normally, root should only be allowed to connect from 'localhost'.  This
	ensures that someone cannot guess at the root password from the network.

	Disallow root login remotely? [Y/n] ## Pressione Enter
	 ... Success!

	By default, MariaDB comes with a database named 'test' that anyone can
	access.  This is also intended only for testing, and should be removed
	before moving into a production environment.

	Remove test database and access to it? [Y/n] ## Pressione Enter
	 - Dropping test database...
	 ... Success!
	 - Removing privileges on test database...
	 ... Success!

	Reloading the privilege tables will ensure that all changes made so far
	will take effect immediately.

	Reload privilege tables now? [Y/n] ## Pressione Enter
	 ... Success!

	Cleaning up...

	All done!  If you've completed all of the above steps, your MariaDB
	installation should now be secure.

	Thanks for using MariaDB!


Nenhum comentário
Postar um comentário